Zoho Inventory and Xero Integration
Use the Zoho Inventory and Xero Integration to unify your inventory management and accounting. In the following sections, you’ll learn how to set up the integration and how to use it efficiently along with other tips and tricks.
How It Works

- To keep track of your stock, create a Fixed Asset account in Xero with its type set as Current Asset.
- Have an active account with Xero.
- Ensure that the base currency is the same in both Xero and Zoho Inventory.
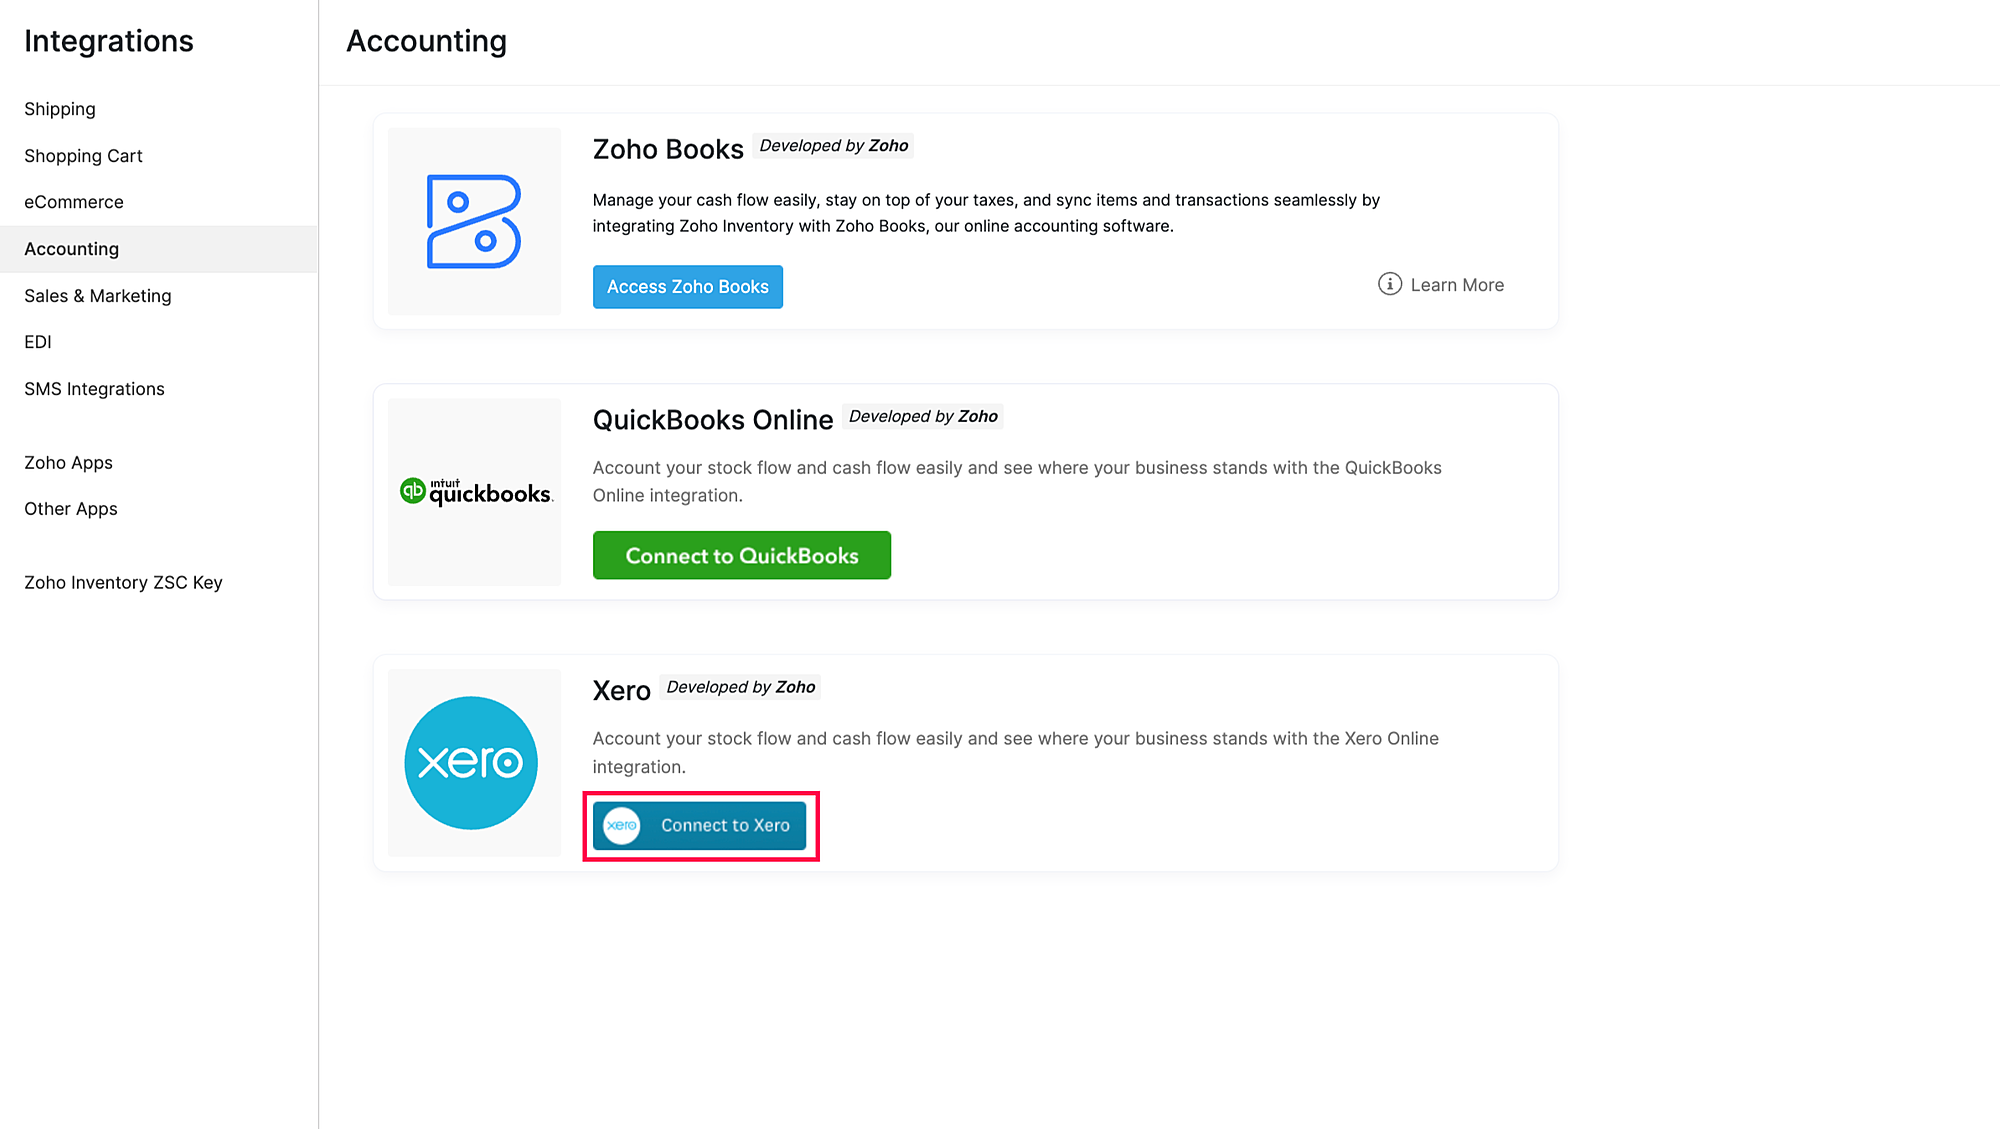
Authorize Access to Xero
To set up the integration you’ll have to authorize access to Xero. To do this:
- Log in to your Zoho Inventory organization.
- Go to Settings > Integrations and select Accounting.
- Click Connect to Xero.
- In the page that opens, log in to your Xero account. Select the organization in Xero that you want to integrate with and click Allow access to agree to transfer data between the apps.
After completing the initial setup, you can configure the integration and choose the accounts that you want to sync between the apps.
Configure the Integration
Once you authorize access to Xero, you can configure the integration. Configuring the integration is split into four sections:
- Import From Xero
- Export To Xero
- Asset Account
- Tax Mapping
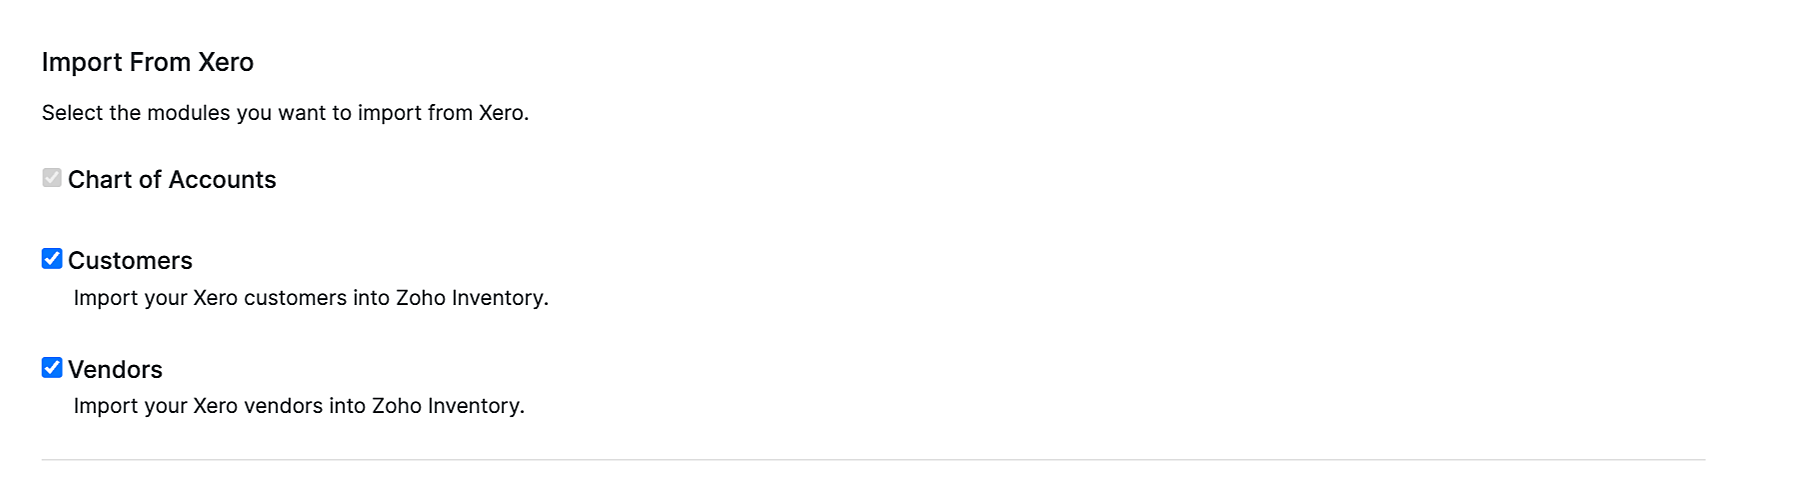
Import From Xero
This section lets you select what you want to import from Xero into Zoho Inventory.
- The Chart Of Accounts option will be checked by default and imported into Zoho Inventory.
- If you want to import your customers and vendors, check the option next to Customers and Vendors.
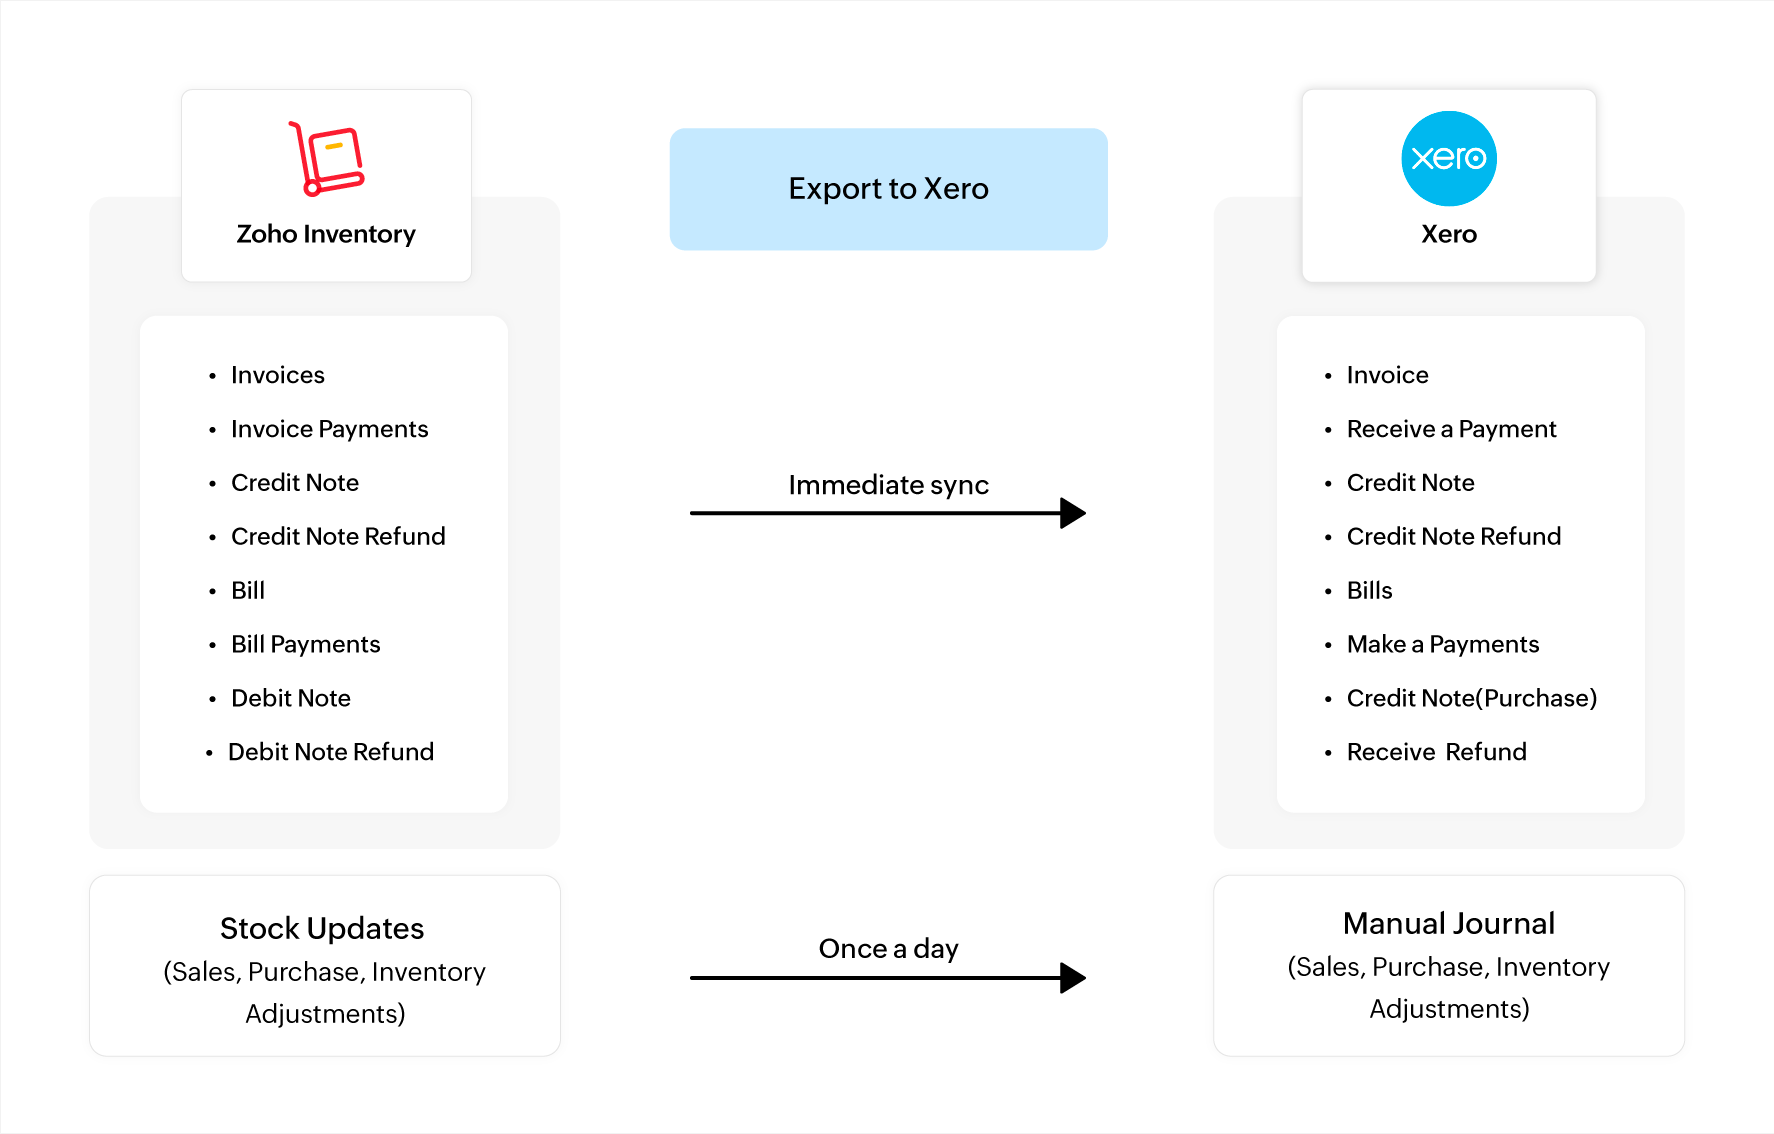
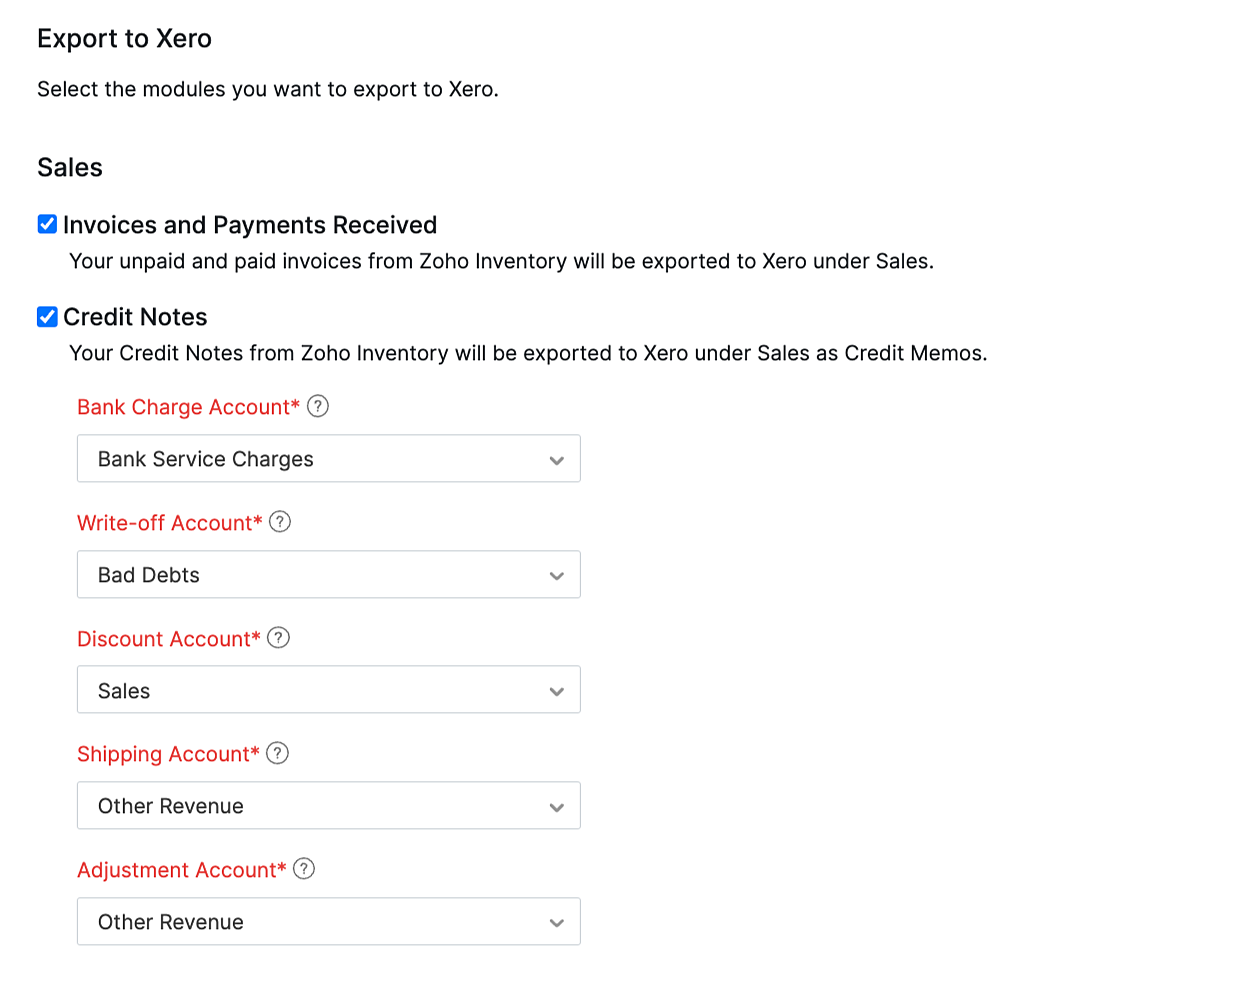
Export to Xero
This section lets you select what you want to export to Xero from Zoho Inventory. The first part in this section lets you configure the sales transactions you want to export and in the next section, you can configure your export preferences for purchase transactions.
Sales
- Check the Invoices and Payments Received option to export your invoices along with the payments received for them to Xero.
- Note: When an invoice is written off in Zoho Inventory, a credit note is automatically created and associated with the corresponding invoice in Xero.
- Check the Credit Notes option to export credit notes to Xero.
- Select an account under which you want to record the bank charges, write-offs, discounts, shipping charges, and adjustments recorded from sales transactions.
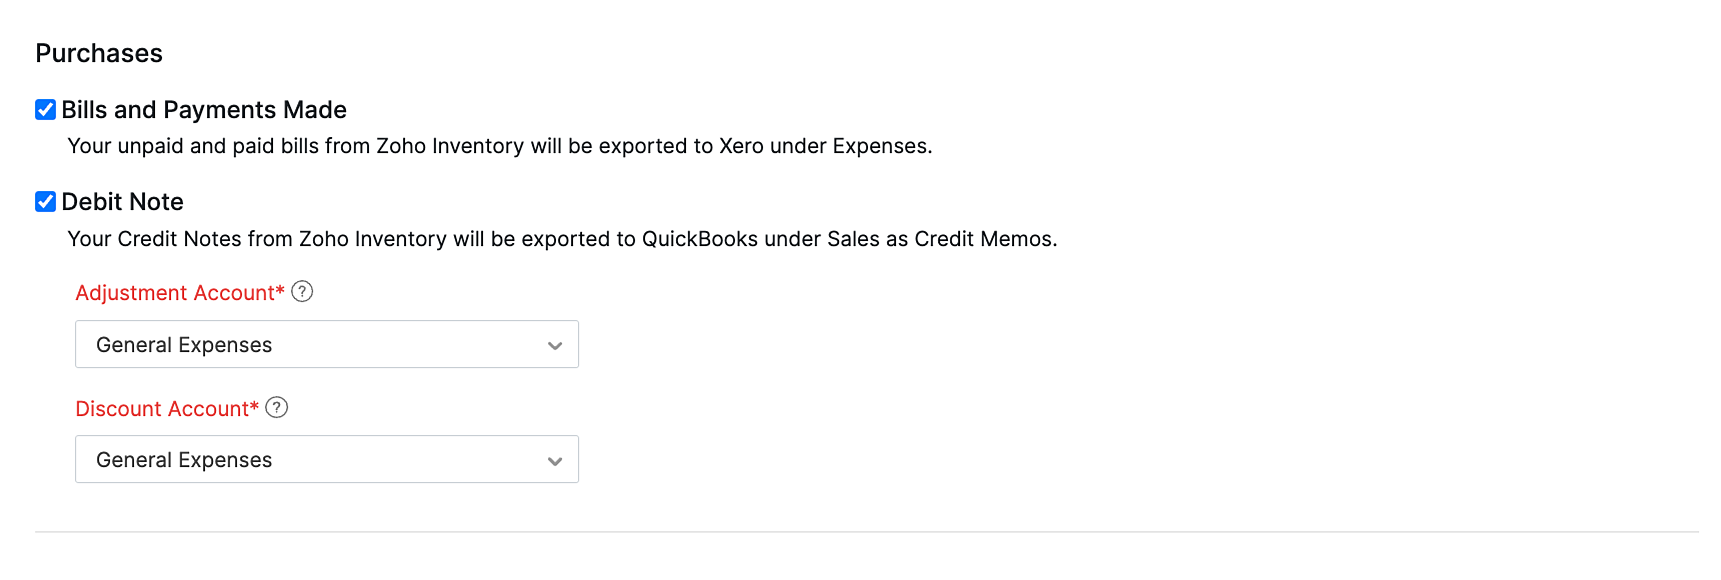
Purchases
- Check the Bills and Payments Made option to export your bills along with the payments made for them to Xero.
- Check the Debit Notes option to export debit notes to Xero.
- Select an account under which you want to record discounts and adjustments from purchase transactions.
Asset Account
The Asset Account lets you track your company’s assets by keeping a record of the value of items in a sales or purchase transaction. This data will be pushed to an account in Xero once a day. To set an account as the asset account:
- Select an account under which you want to record your company’s assets from the Asset Account dropdown.

Tax Mapping
To map taxes in Zoho Inventory with taxes in Xero:
- Select an existing tax in Zoho Inventory under Taxes in Zoho Inventory, and then select the corresponding Xero tax to be mapped under Taxes in Xero.

- Click Save after configuring all the required fields.
Sync Between Zoho Inventory and Xero
Here’s how the actions you do in Zoho Inventory will be recorded in Xero:
| Action in Zoho Inventory | What Happens in Xero | Sync Type | Sync Restrictions |
|---|---|---|---|
|
Create a contact (customer or vendor)
|
Creates a new contact
|
Two-way sync
|
A contact will be exported only if it’s associated with a transaction after integrating.
|
|
Create an invoice
|
Creates a new invoice
|
One-way sync
|
Invoices in the draft status won’t be exported.
|
|
Update an invoice
|
Updates the corresponding invoice
|
One-way sync
|
The invoice won’t be updated if it has associated payments or credit; it has been voided or written off.
|
|
Delete or void an invoice
|
The invoice will be voided.
|
One-way sync
|
Invoices that have been written off, or associated with a credit note cannot be voided.
|
|
Write off an invoice
|
A credit note will be created and the credits will be associated with the invoice.
|
One-way sync
|
No restrictions
|
|
Record a payment for an invoice
|
Creates a payment and associates it with the invoice.
|
One-way sync
|
No restrictions
|
|
Record a bank charge
|
A spend bank transaction will be created and associated with the specified bank.
|
One-way sync
|
No restrictions
|
|
Update the payment for an invoice
|
Updates the payment recorded for the corresponding invoice
|
One-way sync
|
No restrictions
|
|
Delete the payment associated with an invoice
|
Deletes payment for the corresponding invoice
|
One-way sync
|
No restrictions
|
|
Create a bill
|
Creates a new bill
|
One-way sync
|
Bills in the draft status won’t be exported
|
|
Update a bill
|
Updates the corresponding bill
|
One-way sync
|
The bill won’t be updated if it has payments or debit notes associated with it.
|
|
Void or delete a bill
|
Voids the corresponding bill
|
One-way sync
|
The bill won’t be voided if it is associated with a debit note
|
|
Record a payment for a bill
|
Creates a payment and associates it with the bill
|
One-way sync
|
No restrictions
|
|
Update the payment associated with a bill
|
Updates the payment associated with the payment
|
One-way sync
|
No restrictions
|
|
Delete the payment associated with a bill
|
Deletes the payment associated from corresponding bill
|
One-way sync
|
No restrictions
|
|
Create a credit note
|
Creates a new credit note
|
One-way sync
|
Credit notes in the draft status won’t be exported
|
|
Update a credit note
|
Updates the corresponding credit note
|
One-way sync
|
No restrictions
|
|
Allocate credits from a credit note to an invoice
|
Allocates the credits from the corresponding credit note to the specified invoice.
|
One-way sync
|
No restrictions
|
|
Delete a credit note
|
Deletes the corresponding credit note
|
One-way sync
|
If you’ve associated the credit note with an invoice, you must remove it.
|
|
Create a vendor credit
|
Creates a new debit note
|
One-way sync
|
Debit notes in the draft status won’t be exported
|
|
Update a vendor credit
|
Updates the corresponding debit note
|
One-way sync
|
No restrictions
|
|
Allocate credits from a vendor credit to a bill
|
Allocates the debits from the corresponding debit note to the specified bill.
|
One-way sync
|
No restrictions
|
|
Delete a vendor credit
|
The debit note will be deleted
|
One-way sync
|
You need to de allocate any credits used from the debit note from Xero’s UI
|
|
Create a refund for a credit note
|
Creates a refund for that corresponding credit note
|
One-way sync
|
No restrictions
|
|
Update a credit note refund
|
Updates the corresponding credit note refund
|
One-way sync
|
No restrictions
|
|
Delete a credit note refund
|
Deletes the corresponding credit note refund
|
One-way sync
|
No restrictions
|
|
Create a refund for a vendor credit
|
Creates a refund for that corresponding vendor credit
|
One-way sync
|
No restrictions
|
|
Update a vendor credit refund
|
Updates the corresponding vendor credit refund
|
One-way sync
|
No restrictions
|
|
Delete a vendor credit refund
|
Deletes the corresponding vendor credit refund
|
One-way sync
|
No restrictions
|
Sync Details of Contacts
The table below will show you how your contacts from Zoho Inventory will be stored in Xero.
| Zoho Inventory | Xero |
|---|---|
|
Display Name
|
Contact name
|
|
First name
|
First name
|
|
Last Name
|
Last name
|
|
Email
|
Email
|
|
Phone - Work
|
Phone Number
|
|
Phone - Mobile
|
Mobile number
|
|
Billing address
|
Billing Address
|
|
Shipping address
|
Delivery Address
|
|
Currency
|
Currency
|
|
Contact persons
|
Additional People
|
Sync Details of Invoices
The table below will show you how your invoices from Zoho Inventory will be saved in Xero when it syncs.
| Zoho Inventory | Xero |
|---|---|
|
Invoice#
|
Invoice#
|
|
Invoice Date
|
Date
|
|
Due Date
|
Due Date
|
|
Currency code
|
Currency code
|
|
Exchange rate
|
Exchange rate
|
|
Item name and description
|
The item name and description will be recorded in the description field
|
|
Item Rate
|
Unit price
|
|
Item Quantity
|
Qty
|
|
Discount
|
The item name along with the discount amount will be added as a separate line item
|
|
Tax
|
Tax rate
|
|
Tax type
|
Amounts are
|
|
Shipping charges
|
The item name along with the shipping charge will be added as a separate line item
|
|
Adjustments
|
The item name along with the adjustment amount will be added as a separate line item
|
|
Round off
|
The item name along with the round off amount will be added as a separate line item
|
Sync Details of Bills
The table below will show you how your bills from Zoho Inventory will be saved in Xero when it syncs.
| Zoho Inventory | Xero |
|---|---|
|
Bill#
|
Reference
|
|
Bill Date
|
Date
|
|
Due Date
|
Due date
|
|
Currency Code
|
Currency code
|
|
Exchange rate
|
Exchange rate
|
|
Item name and description
|
The item name and description will be recorded in the description field
|
|
Item rate
|
Unit price
|
|
Item quantity
|
Qty
|
|
Discount
|
The item name along with the discount amount will be added as a separate line item
|
|
Tax
|
Tax rate
|
|
Adjustments
|
The item name along with the adjustment amount will be added as a separate line item
|
Sync details of Items
Items in Zoho Inventory will not be synced with Xero automatically. However, you can export the items from Xero and import them into Zoho Inventory if you want to view them.
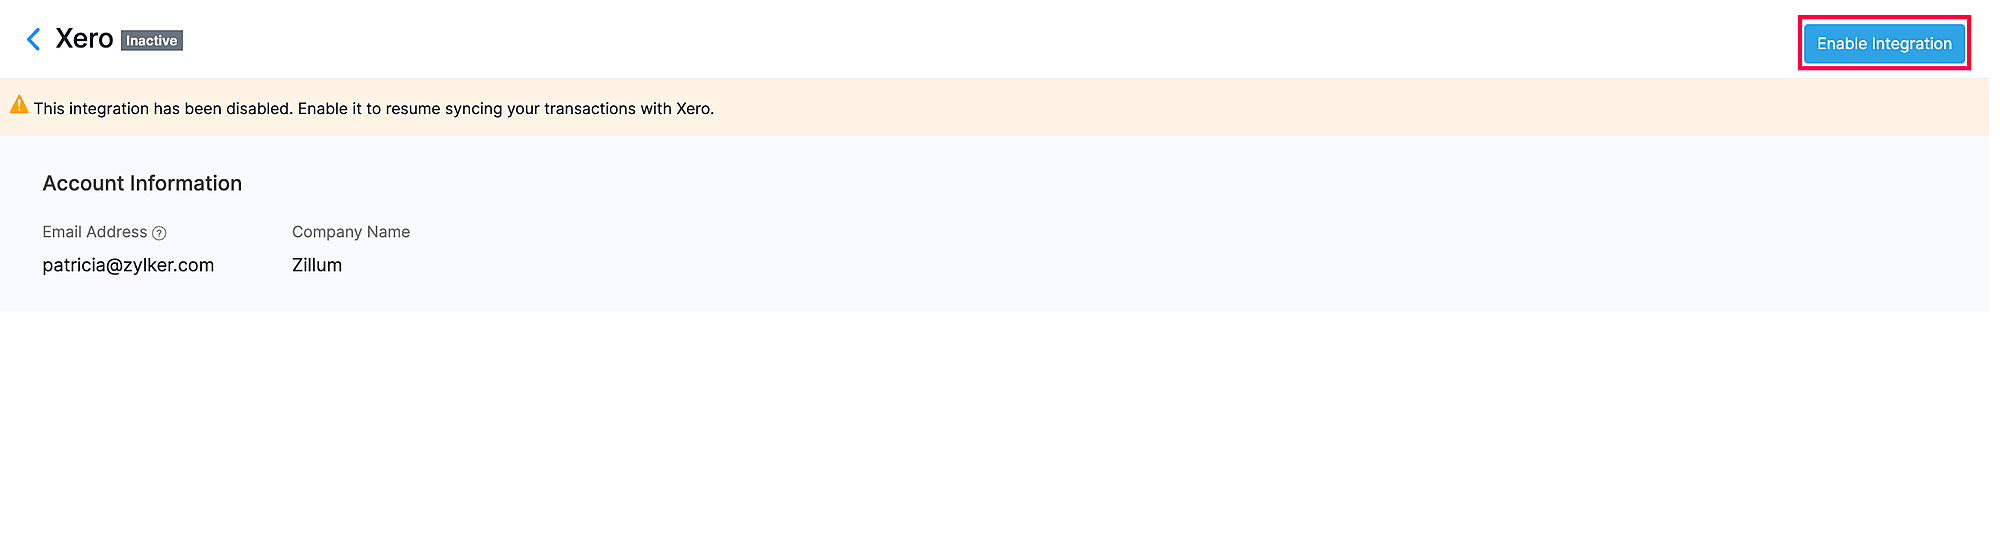
Disable or Enable the Integration
When you disable the integration, the integration will be put on hold and no data will exported or imported from Xero. You can enable it again whenever you want without having to configure the integration from scratch. To disable the integration:
- Log in to your Zoho Inventory organization.
- Go to Settings > Integrations and select Accounting.
- Click Show Details in the Xero tile.
- In the integration details page, click the dropdown next to Configure in the top right corner and select Disable Integration.
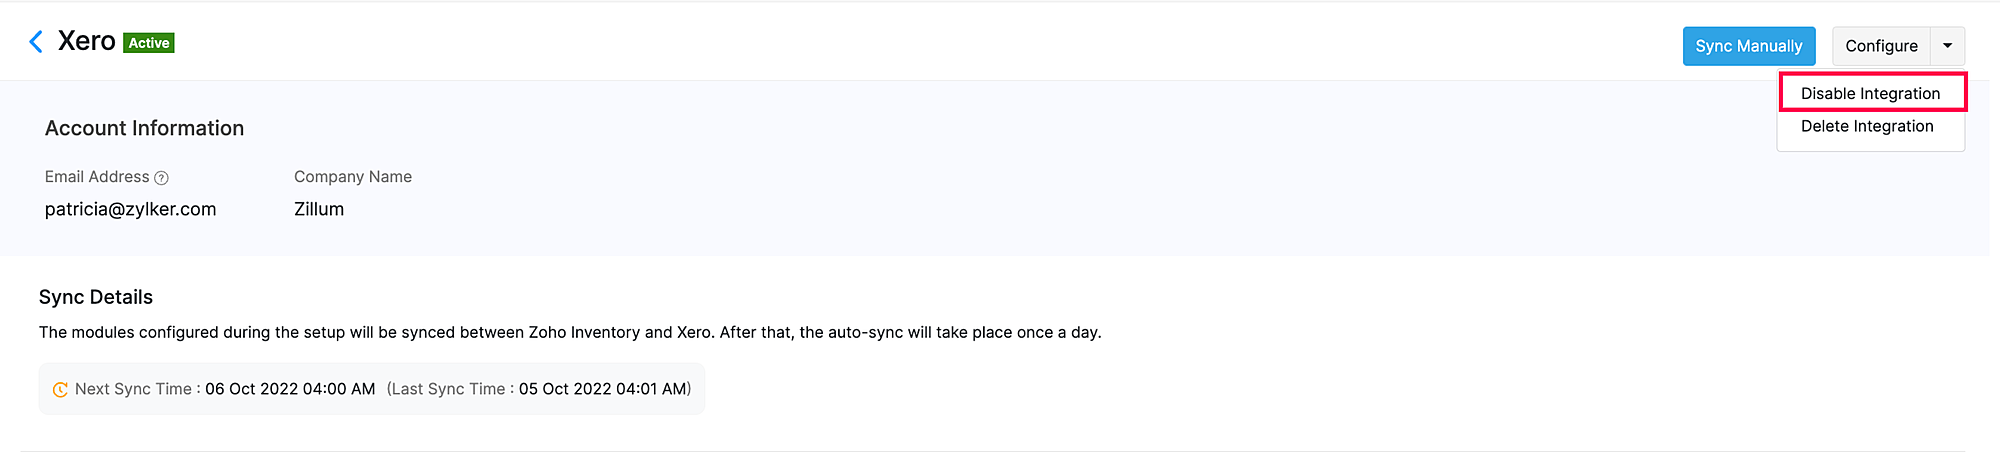
- In the popup that opens, click Disable Integration again.
- To enable the integration, go to the integrations details page by following steps 2 to 4 and select Enable Integration from the top right corner.
Delete the Integration
To delete the integration:
- Log in to your Zoho Inventory organization.
- Go to Settings > Integrations and select Accounting.
- Click Show Details in the Xero tile.
- In the integration details page, click the dropdown next to Configure in the top right corner and select Delete Integration.

- In the popup that opens, click Delete Integration to remove the integration.
After you delete the integration, Zoho Inventory and Xero will not be in sync. However, any existing data will continue to remain in both Zoho Inventory and Xero.