How to Setup Automation in Zoho People
What is automation in Zoho People?
Automation in Zoho People helps in streamlining HR processes, reducing manual effort, and enhancing efficiency. Through automated workflows, mail alerts, checklists, and custom functions, it eliminates redundancy, ensures data accuracy, and enables the timely completion of tasks without requiring human intervention once configured. It can include simple data-based actions, such as sending reminders, to complex multi-stage workflows for employee query management.
What automation can you perform in Zoho People?
- Workflows:
Workflow automation helps you automate all your HR processes by eliminating most of the manual administrative work. You can preset and customize the workflow process, and full access control to the administrative processes will be given. - Blueprints:
Blueprint is a systematic flowchart of your HR processes, created digitally in Zoho People. It captures each and every stage in an HR process that you follow offline. - Actions
- Email Alerts:
Improve your workflow with automatic email alerts and be up-to-date at all times. Get instant notifications when specific actions, such as requests, status updates, edits, and approvals, are executed. - Checklists & Tasks:
Checklists and tasks exist to ensure that all necessary actions are completed efficiently and on time. With checklists, users can list and organize tasks or action items, providing a clear overview of what needs to be accomplished. Tasks are individual action items assigned to specific owners, facilitating accountability and tracking of progress. By creating tasks and assigning them to responsible individuals, organizations can streamline workflow management, maintain records of completed activities, and enhance overall productivity and efficiency. - Field Updates:
Field updates are used to dynamically update form fields through associated actions as part of a workflow, blueprint, or custom action. The field gets automatically updated in the related form when selecting or providing the specific lookup value in the form. This feature is very useful to avoid manual value entries in the related forms and thus saves time. - Webhooks:
It communicates with third-party applications by sending instant notifications every time a user performs an action in the Zoho People organizational account data. Webhooks are so useful, flexible, and totally customizable. Learn more. - Custom Functions:
Custom functions let you create user-defined functions that can be reused anywhere in Zoho People. You can maintain and edit custom functions, and the script will be in one central location. These functions are mainly created to manipulate data, connect with third parties and internal applications, and update responses in Zoho People. - E-Sign Flow (Requires integration with Zoho Sign):
Create pre-configured flows to get documents esigned from different recipients for varied official requirements. Learn More. - Posts for Zoho Connect (People Plus or Zoho Connect integration required):
Automated messages can be scheduled and posted in Zoho Connect using workflows from Zoho People/People Plus. This enables the automatic posting of periodic announcements, reminders, notifications, and other messages on walls and public groups within Zoho Connect. Learn More.
- Email Alerts:
- Schedulers
- Absent Scheduler (Attendance service only):
Use a scheduler to automatically notify or mark the absence of employees who have forgotten to check-in. - Compensatory Off Scheduler (Leave service only):
The compensatory off scheduler records an employee’s work done on a weekend or holiday automatically. - Timesheet Scheduler (Timesheet service only):
Add timesheet scheduler to collate time logs as timesheet and submit for approval automatically.
- Absent Scheduler (Attendance service only):
- Templates
- Email Templates:
Use email templates to create ready-to-use emails that can be used in workflows, blueprints, and custom actions. - Letter Templates:
Letter templates are used to create standardized official letters for specific purposes, streamlining the process of generating official correspondence. - Mail Merge Templates:
Create templates to send standard HR documents such as probation letters and contracts to multiple employees at once.
- Email Templates:
- Reminders (Timesheet service only):
Set timely reminders to remind your employees to log time and submit their timesheets. - Present By Default (Attendance service only):
It is used to mark selected users as present automatically. - Shift Rotation (Shift service only):
Automatically change the assigned shift for employees based on the specified frequency. - Notifications (Performance, Onboarding, Cases service, Office Readiness, Employee Engagement services):
Enable or disable default notifications and customize (if applicable).
Not all services support every automation feature. Select a service and go to the Automation tab to see the list of automation features supported. Some services may include preconfigured and editable automation.
Add Your Heading Text Here
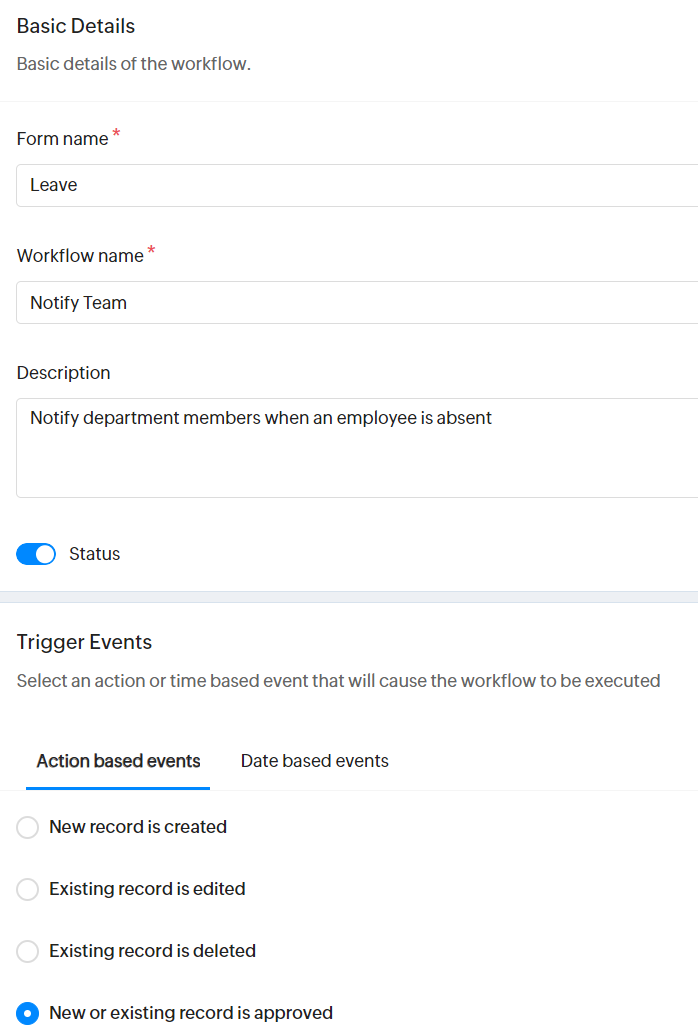
Leave Service – Notify team about employee leave
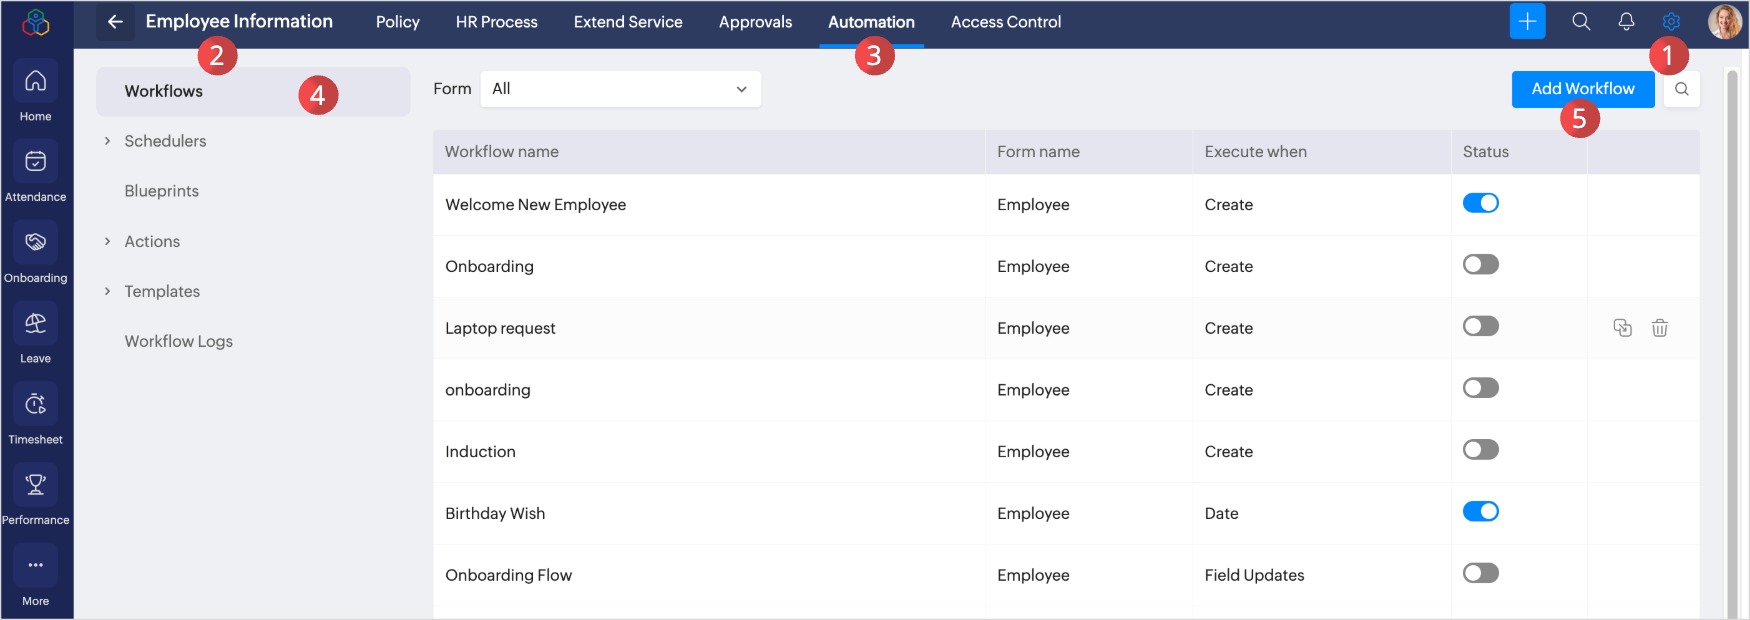
- Go to Settings > Leave > Automation > Workflows and click on Add Workflow.
- Enter the basic details and select New or existing record is approved radio button within “Action Based Events”.
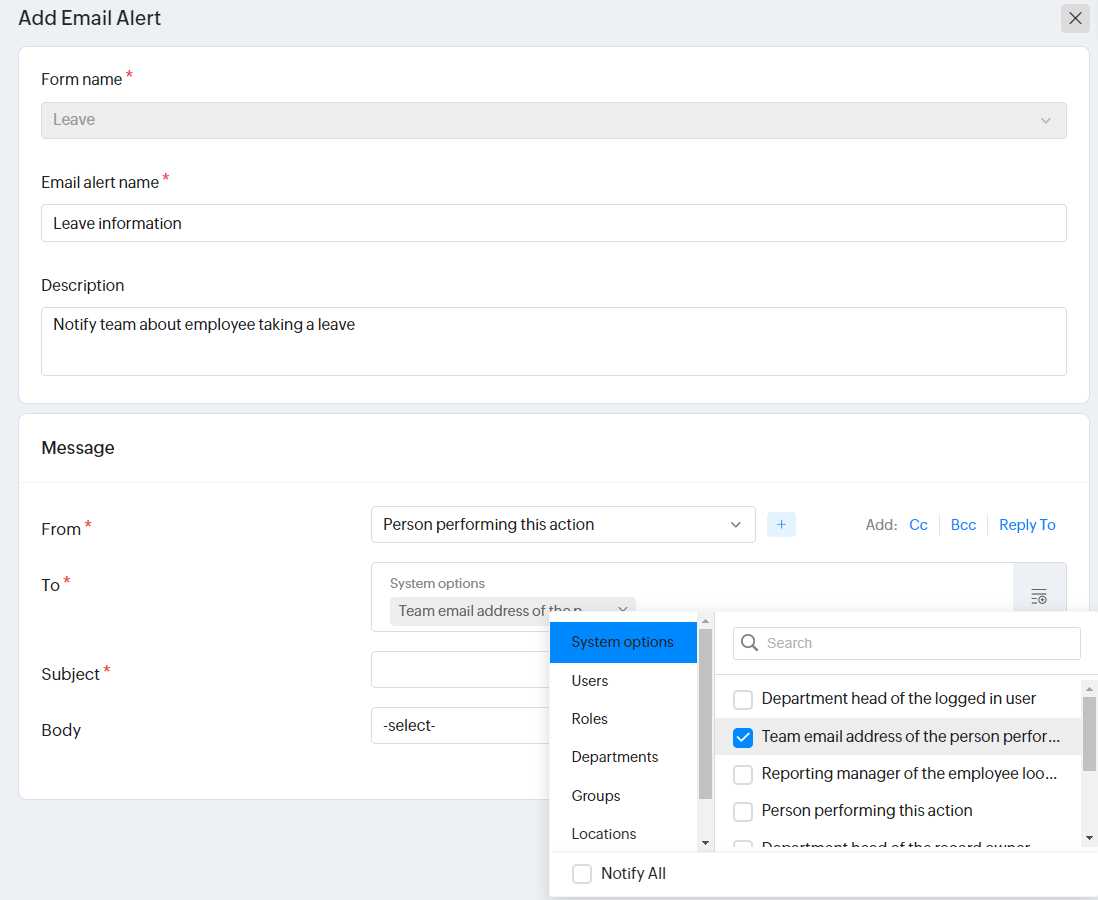
3. Now head to the “Actions” space and select Email Alert. “Person performing this action” will be the “From” and “To” will be “Team email address of the person performing this action”. This can be selected by using the () icon.
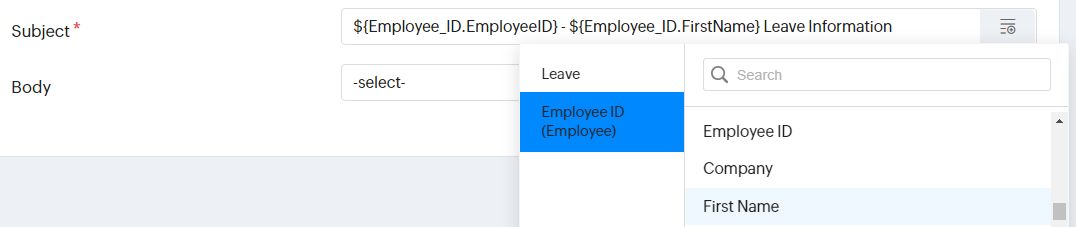
4. The subject is also smartly composed using the prebuilt options.
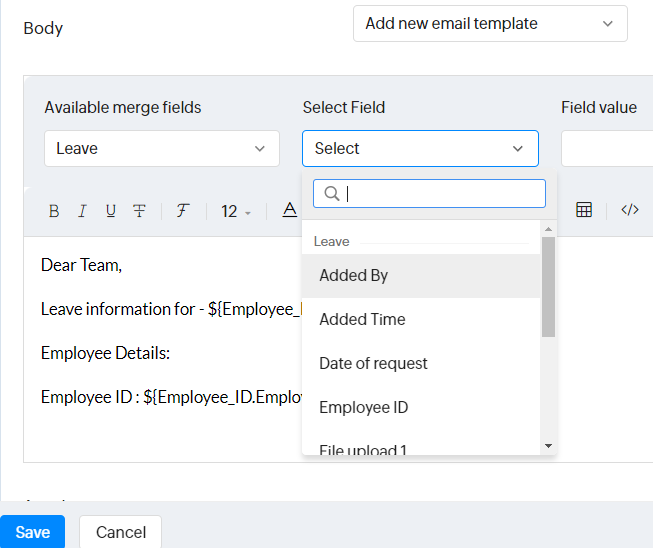
5. The body of the email alert is composed by inserting custom text and using the available merge/select field options. The final text used is:
Dear Team,
Leave information for – ${Employee_ID.FullName}
Employee Details:
Employee ID : ${Employee ID.EmployeelD}
Leave Type : ${Leavetype}
From : ${From}
To : ${To}
Reason : ${Reasonforleave}
6. Finally click Save.
7. The workflow is now configured and team members will be automatically notified when an employee takes leave.
Birthday Remainder
Purpose
To create a workflow to send a birthday wish to employees on their birthday automatically.
Workflow process
You can configure a workflow which will automatically trigger an email to employee(s) wishing them on their birthday.
To send automated Birthday Reminder to your employees
Step 1: Create a Birthday Email template.
- Navigate to Settings > Employee Information > Automation > Templates > Email Templates.
- Create an Email Template for birthday reminder

Step 2: Set up the Workflow to trigger Birthday email.
- Navigate to Settings > Employee Information > Automation > Workflow.
- Click Add Workflow.
3. Select the Employee form from the form dropdown.
4. Enter the Workflow name as Birthday Reminder.
5. In the trigger events, select Date Based events.
6. Select the event date field, the date field in the employee form are listed, select Date of Birth.
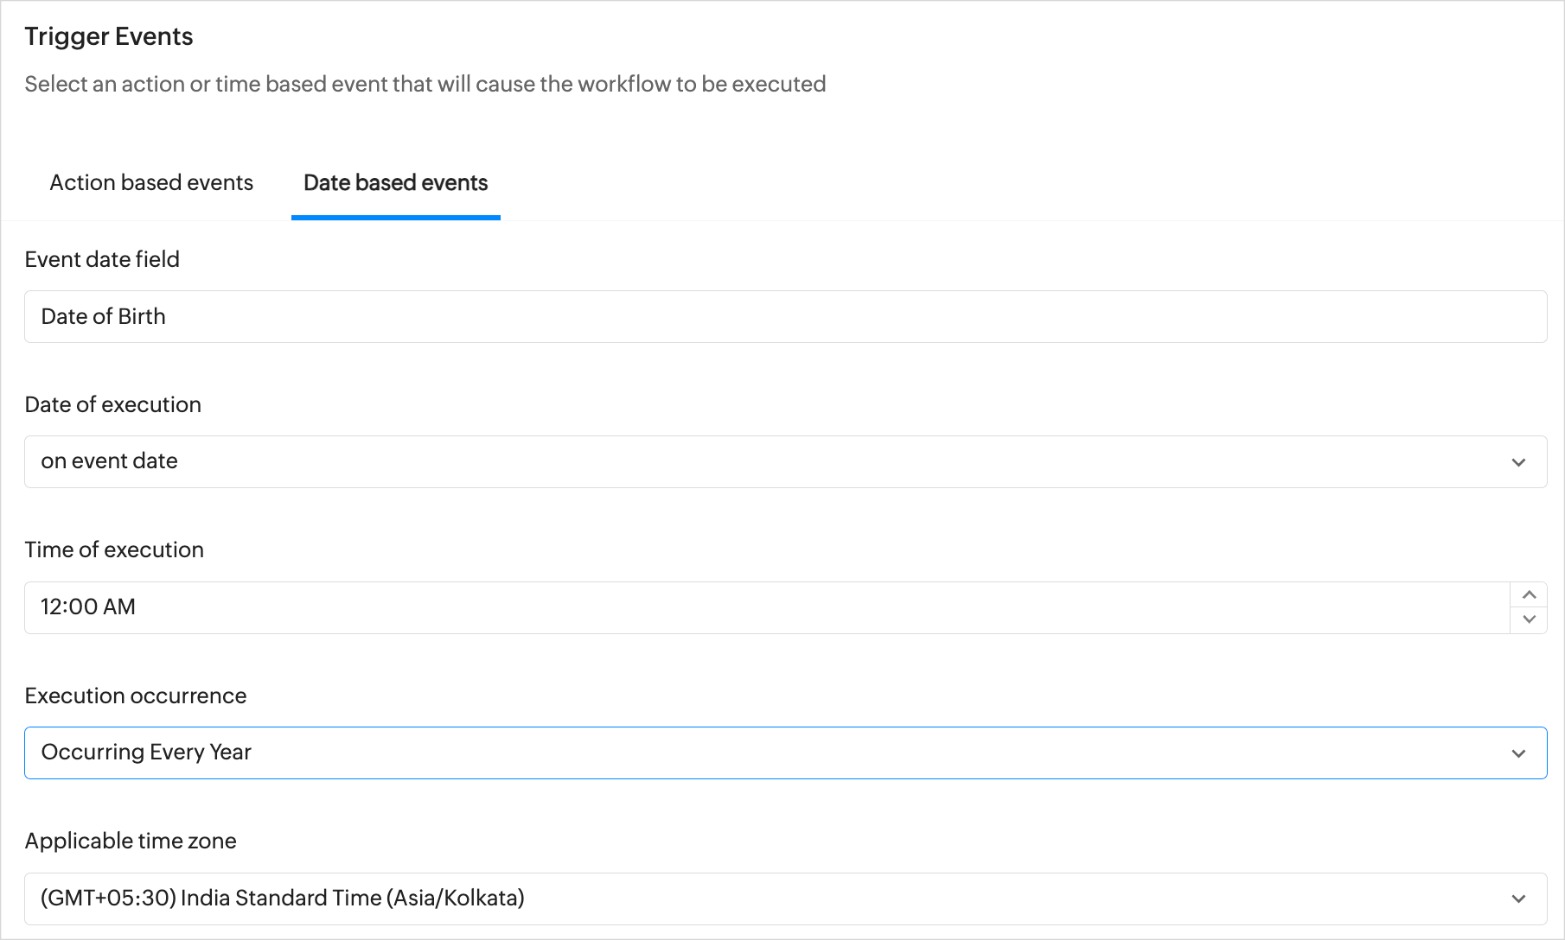
7. Select the date of execution as on event date.
8. Select the time of workflow execution, based on our use case (12:00 A.M.)
9. Select occurrence as every year.
10. Select the time Zone.
11. In the Actions > Email Alerts, select the Email template created for the Birthday reminder.

12. Click Save.
Birthday email will be automatically triggered to your employees.
Work Anniversary Email
Purpose
To send emails automatically to employees wishing them on their work anniversary.
Workflow process
You can configure a workflow which will automatically trigger email alerts to employees as and when they complete one or more years of service at work.
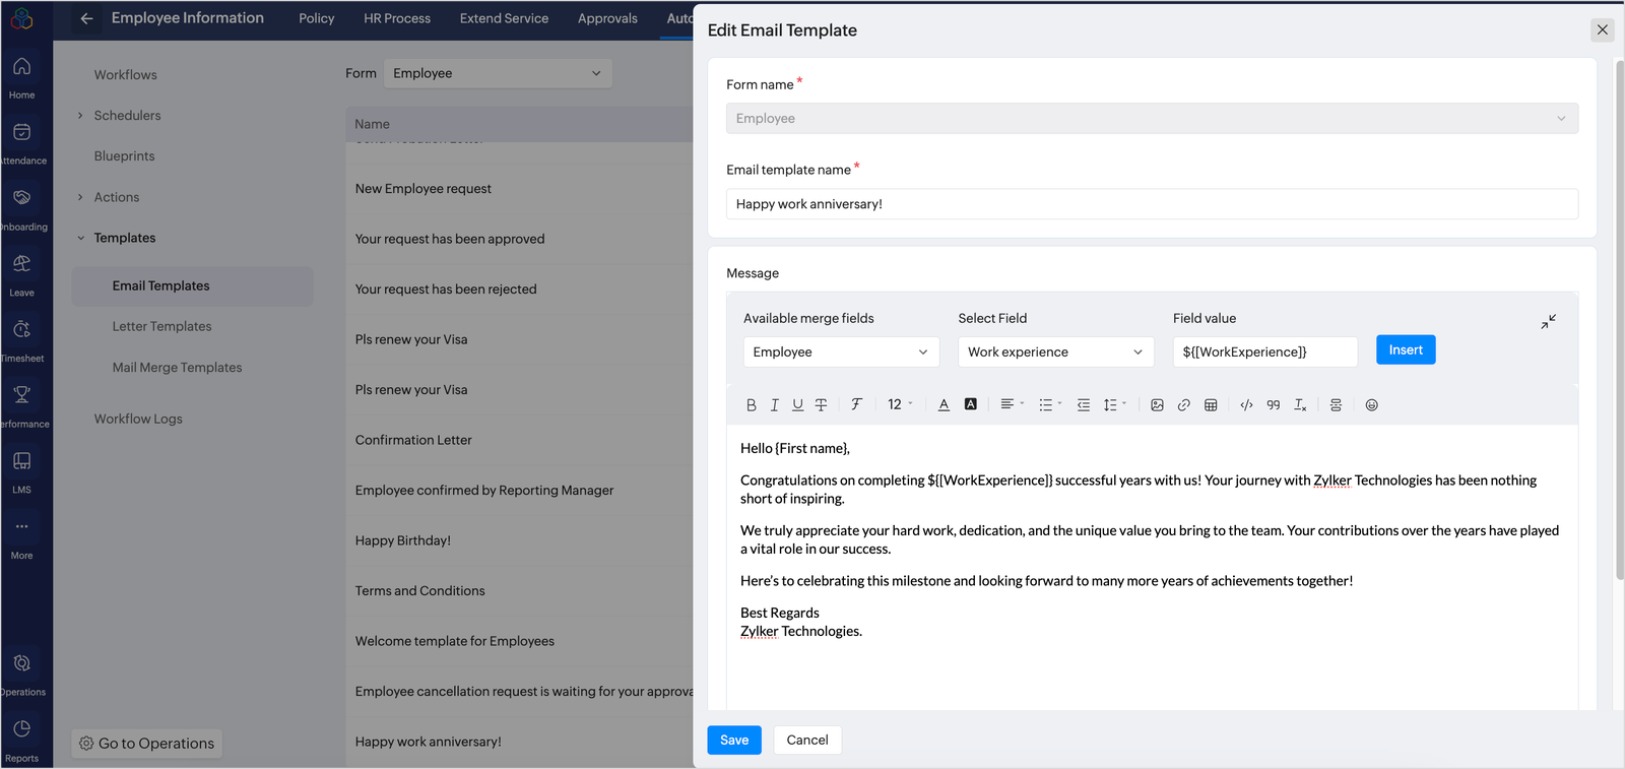
Step 1: Create Work Anniversary Email template.
- Navigate to Settings > Employee Information > Automation > Templates > Email Templates.
- Create an Email Template for the work anniversary.
Step 2: Set up the Workflow to trigger Work Anniversary email.
- Navigate to Settings > Employee Information > Automation > Workflow.
- Click Add Workflow.

3. Select the Employee form from the form dropdown.
4. Enter the Workflow name as Work Anniversary.
5. In the trigger events, select Date Based events.
6. Select the event date field, the date field in the employee form are listed, select Date of Joining.
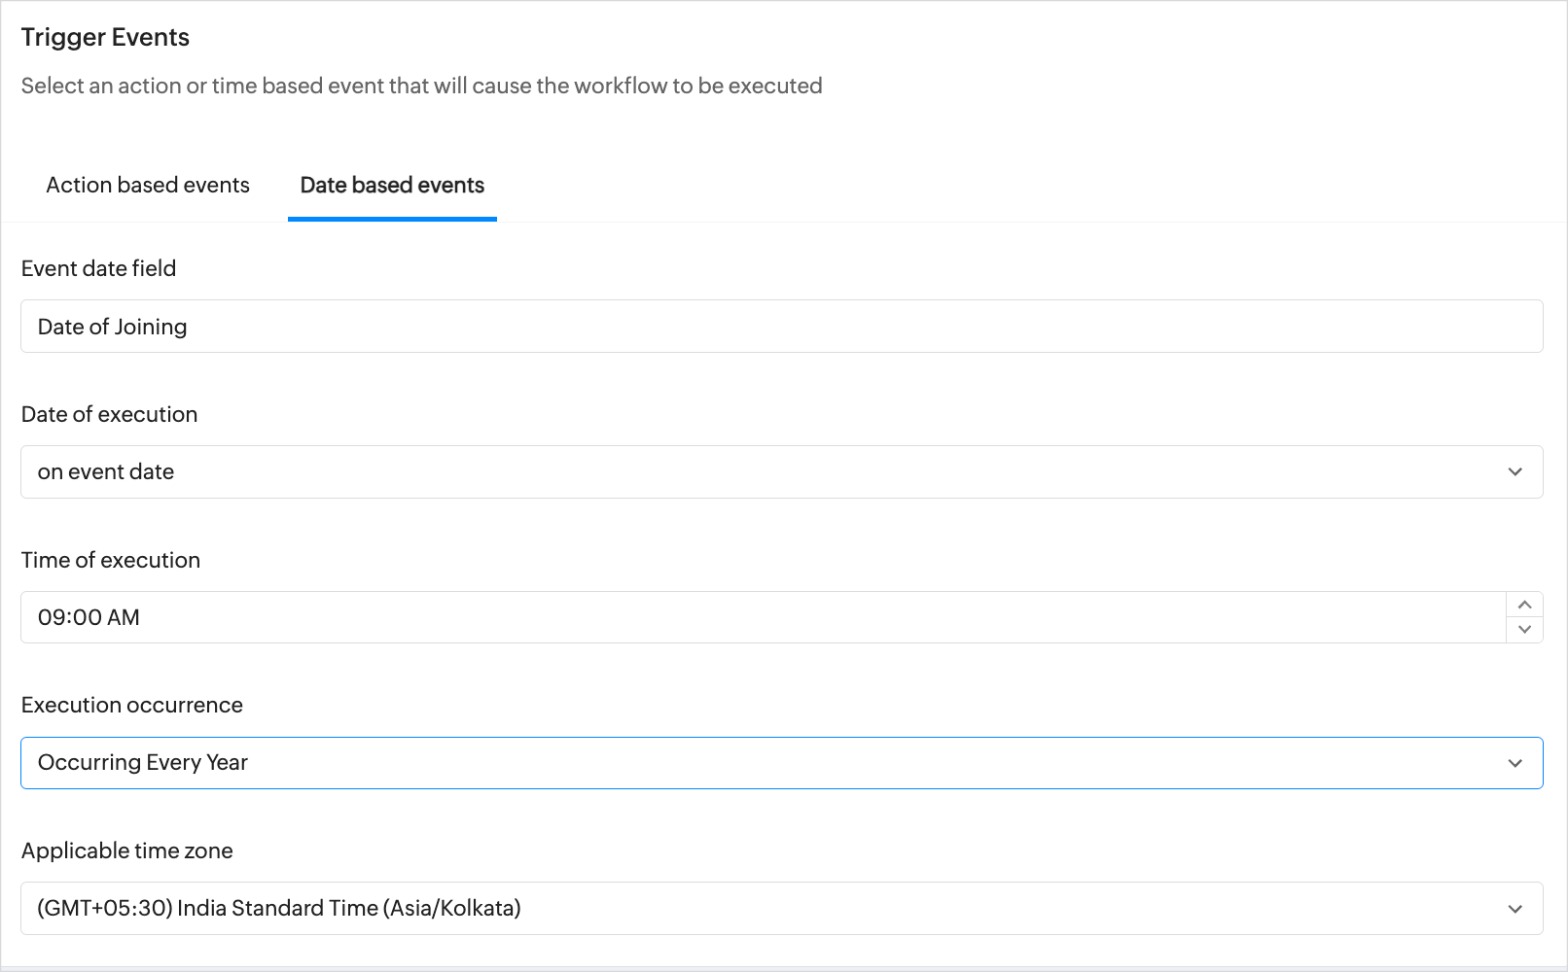
7. Select the date of execution as on event date.
8. Select the time of workflow execution, based on our use case (9:00 A.M.)
9. Select occurrence as every year.
10. Select the time Zone.
11. In the Criteria section, set Current experience is greater than or equal to 1.

12. In the Actions > Email Alerts, select the Email template created for the Work Anniversary.
13. Click Save.
Work anniversary email will be automatically triggered to your employees.
Automatically Remind Employees on their Contract Expiry Date
Lets see how to set up a workflow to remind your employees on their contract expiry date before a month through email alert.
- From your home page, navigate to Settings > Employee Information > Automation > Workflow > Add Workflow
- In the Basic Details section, select the Employee form.
- Enter the workflow name and description, ensure the workflow status is enabled.
- In the trigger event section, select Date based events.

5. In the Event date field, select the Contract Expiry Date.
The Contract Expiry Date is not a default field in the Employee form, so you’ll need to customize it to add this field. Once added, ensure that the Contract Expiry Date is specified for your contract employees.
6. Select the Date of execution as before event date and select the number of months or days before the employee must be notified.
7. Select the time of execution.
8. Select the applicable time zone.
9. Set Criteria to trigger action for only specific employees.
10. In the Actions section, either add a new Email Alert for the Employee form using the (+) option or select an existing email alert that you have created for the Contract Expiry Alert.
11. Click Save.
Employees will be automatically notified 1 month before their contract expiry date.
Automatically Send Employment Confirmation Letter after 6 months of Joining
Sending a confirmation letter to employees after six months of their date of joining in the organization. You can configure a workflow by setting a email notification to be sent along with the confirmation letter as attachment to all employees after six months of their joining date.
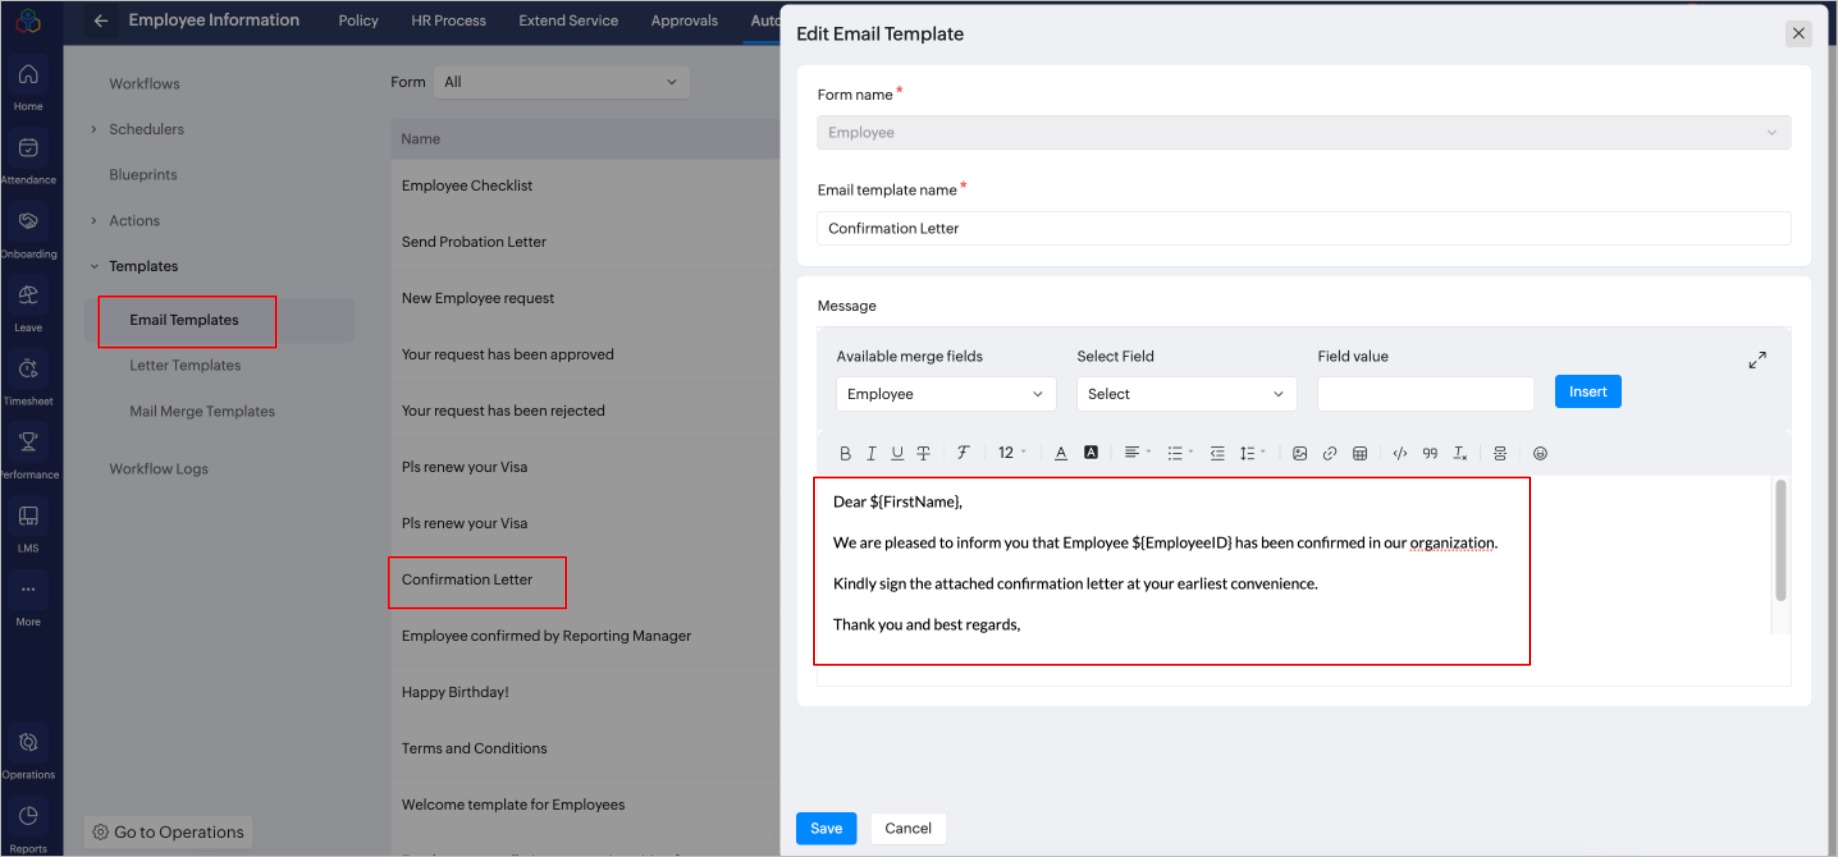
Step 1: Create an Email Template for the Confirmation Letter.
Create an email template for the confirmation letter to be sent to your employees. This email template will be used in the email alerts. To add the email template, refer to Email Templates.
Step 2: Create Confirmation Letter as either Letter template or Mail Merge template for Employee Form
- To create a Confirmation Letter in a simple Letter template format (with only text and form merge fields). Navigate to Settings > Automation > Templates > Letter Templates.
or - Use Mail Merge Template option to create a Confirmation letter with advanced formatting options and design, refer to Mail Merge Template – Zoho People.
Step 3: Add Email Alert for Confirmation Letter.
- Navigate to Settings > Employee Information > Automation > Actions > Email Alerts.
- Click Add Email Alert.
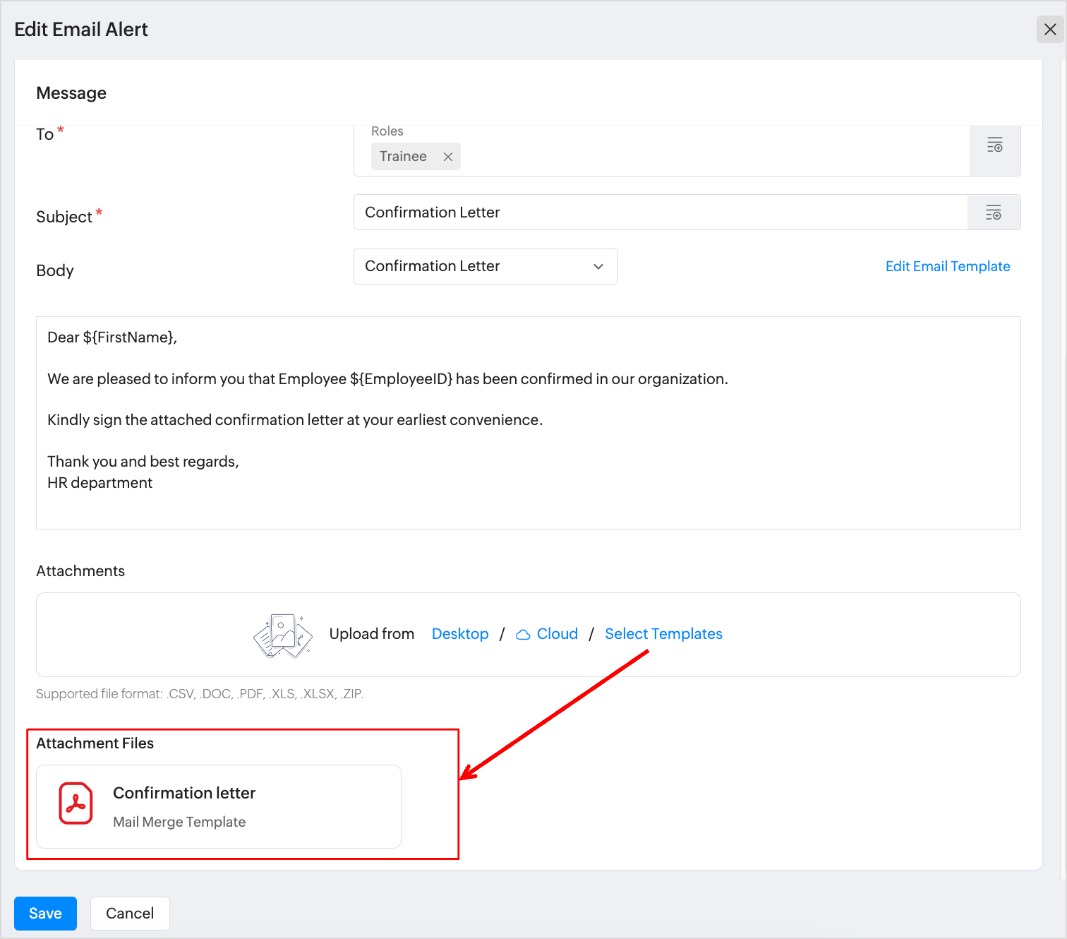
- Select the Form name as Employee and enter the Email alert name as Confirmation Letter.
- In the message section, select From, to, and specify the subject line.
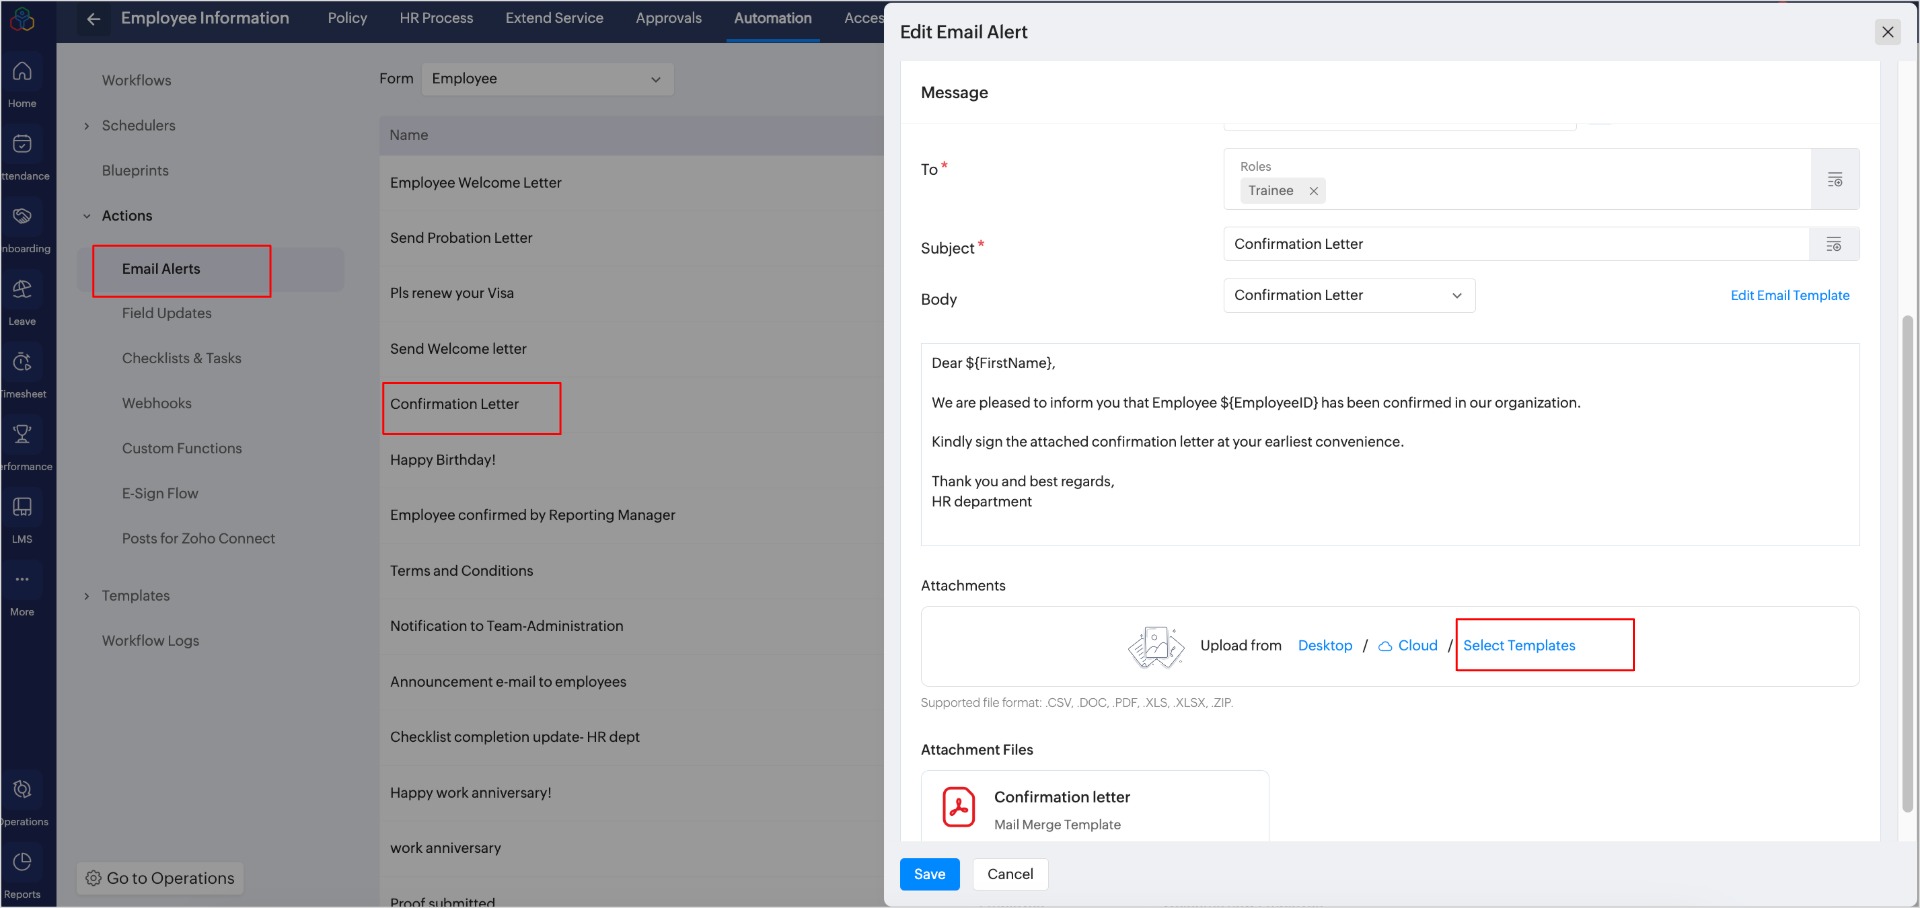
5. Select the Body as Confirmation Letter. This is the Email Template which you have created for Confirmation Letter.
6. In the attachments, select the Templates, you can either choose a Letter template or Mail Merge Template where you have created the Confirmation Letter.
7. Click Save.
Step 4: Create a Workflow to trigger the Confirmation letter after 6 months of Joining.
- Navigate to Settings > Employee Information > Automation > Workflows.
- Click Add Workflow.
- Select Employee Form.
- Enter the workflow name and description.
- Ensure the workflow status is enabled.
- In the Trigger Events section, select Date based events.
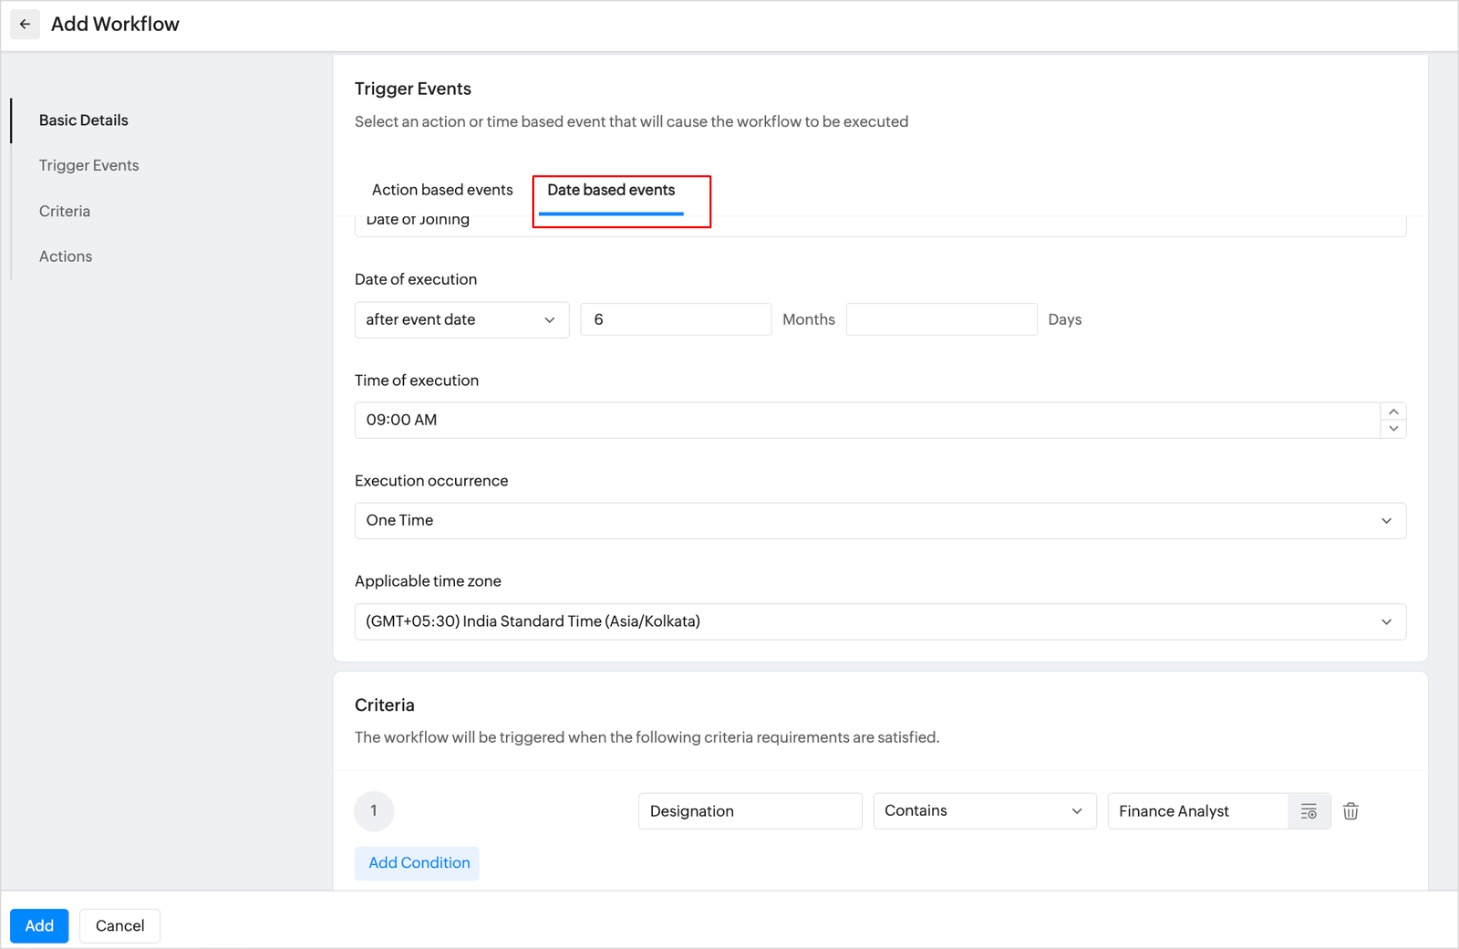
7. Select the Event date field as Date of Joining.
8. Select Date of execution as after event date and enter 6 months and 0 days.
9. Specify the time of execution and occurrence.
10. Select applicable time Zone.
11. Set criteria for sending confirmation letters to employees in specific departments, designations, roles, etc.
12. In the actions, select Email Alert and choose the Confirmation letter Email Alert which you have created.
13. Click Save.
Confirmation letter will be automatically sent via email to applicable employees after 6 months of Joining.
Similarly, you can create a workflow for Automatically sending Welcome Email to your Employees on their Date of Joining.
Step:1 Create a Welcome Email Template for employee form, navigate to Setting > Employee Information > Automation > Templates > Email Templates.
Step 2: Create an Email Alert for employee form, and associate the above email template, navigate to Setting > Employee Information > Automation > Actions > Email Alerts.
Step 3: Create a workflow with a date-based trigger event. Choose the Date of Joining as the event date, and select the time for execution. Set required criteria, and under actions, select the Welcome Email alert. Finally, click Save.
Welcome Email will be sent to applicable employees on their Joining Date.
Notify Employees before their Visa Expiry Date
Reminding your employees before their visa expiry date.
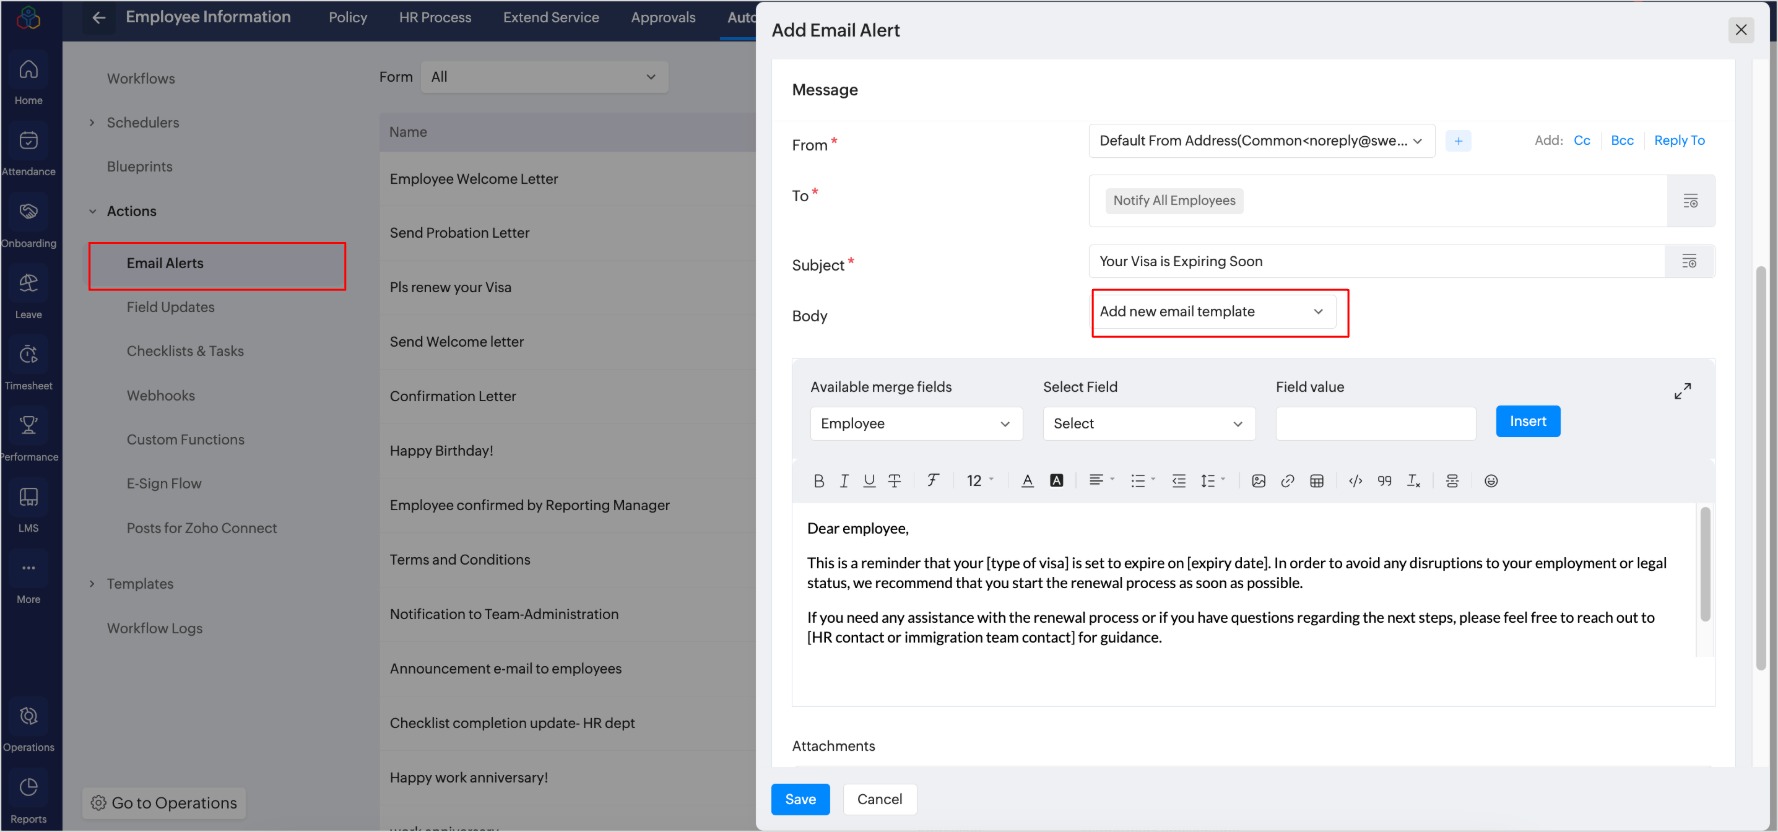
Step 1: Create an Email Alert for visa expiry
- Navigate to Settings > Employee Information > Automation > Email Alerts.
- Click Add Email Alert.
- To add new Email Template, choose Add new email template in the Body.
- Click Save.
Step 2: Create a Workflow to automatically notify employees before their visa expiry.
To set up a workflow:
- Navigate to Settings > Employee Information > Automation > Workflow.
- Click Add Workflow.
- Select Employee in the Form name.
- Select Date based events.
- In the event date field, select Visa Expiry Date.
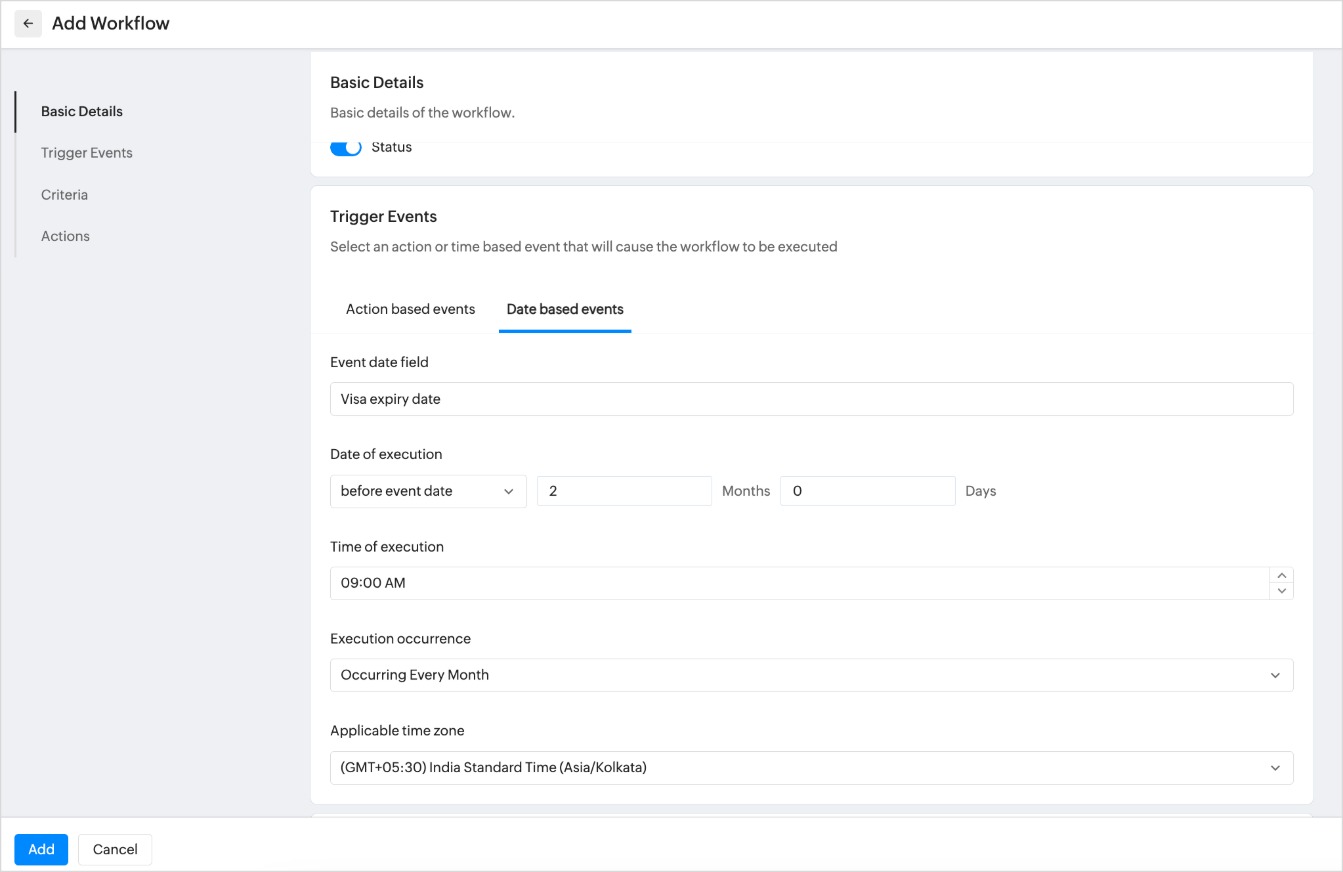
6. In the date of execution, before event date, and enter the number of months before the employee must be notified.
7. Select the time of execution.
8. Select execution occurrence.
9. In the actions section, select the Visa Expiry Email Alert.
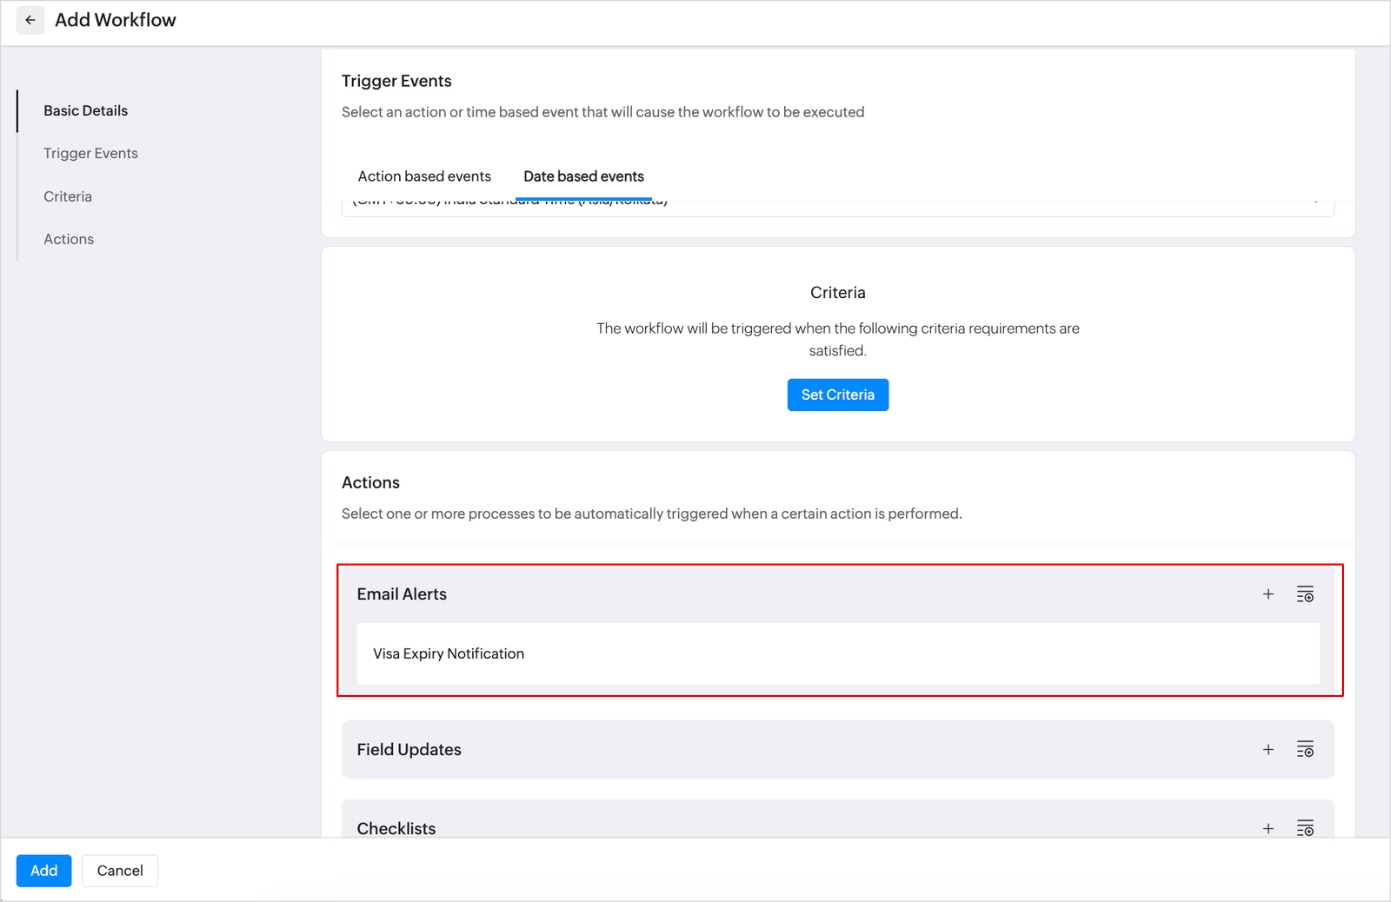
10. Click Add.
Workflow will be added and your employees will be notified 2 months before their Visa Expiry.